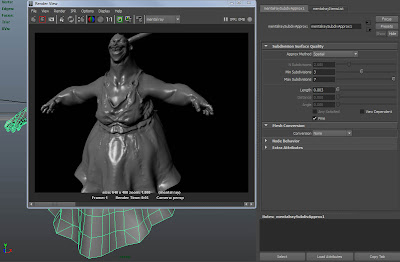
Displacement render in Maya / Mental Ray. Notice the very fine 'length size' of the approximation, to capture all the detail.
As trivial as rendering a detailed Mudbox sculpt in Maya/Max/SI is - even easier and better now with Wayne Robson's new vector displacement shader - fact is that sometimes you really need to render your zBrush sculpts in Mental Ray. Here at FluidPlay Studios we use an extremely high-quality process for Ambient Occlusion generation which involves using a dedicated "generic lighting scenery" that not only computes for the ground plane (instead of the traditional ground-ignorant Ambient Occlusion methods) but also does it using radiosity / global illumination (GI) to achieve the best shadows available to mankind. The price to get all this quality is pretty steep, since it's not possible to get the best quality GI renders without actual displacement maps, mere normal maps won't cut it. So, supposing your model hasn't been sculpted in Mudbox, how to properly export and render your zBrush detail into Mental Ray? Especially if you're using the latest zBrush releases (3.5), here goes a few guidelines that might save you a world of frustration:
- zBrush 3.5's displacement export is inflexible and it sucks, get away of it. Use zB 3.1 instead. Although the file format is not compatible, there's an easy workaround.
- In 3.5, export the highest sub-d level as obj. To increase the chances that your lowest level (generally a re-topologized mesh) isn't distorted, before exporting the model make a few "propagation" passes. Propagate is simply to move a few subdiv levels up (generally two levels are sufficient), go back to the base level and re-import the original mesh. The more you do this, the less you'll see the mesh change each time you import it back in sub-d level 0. Of course you can use morph target instead of re-importing, some people are just scared of it - and to be honest that 'switch' command is quite confusing and error prone - so use whatever you prefer.
- In 3.1, import the obj and go to geometry -> reconstruct subdiv. Do it as many times as you have sub-d levels in the original file.
- If you want to send your zBrush to Mudbox for retouch or vector displacement export, the best method is probably using the "PN8" option in zBrush 3.1's Multi-displacement exporter 3 plugin (MD3). Apply the positive and negative layers in two different mudbox sculpt layers with values +100% and -100% each. http://www.pixologic.com/docs/index.php/Predefined_Configurations
- Before using the MD3 plugin, please notice that the main displacement settings DO affect MD3 export settings. After must fiddling, I've found that you generally get the best quality maps with a smooth-edged UV map (try hiding the seams as well as possible, that's common UV practice anyways) and setting smooth uvs to off, adaptive to ON in the main displacement setting. If you have completely closed model (ie. no skirts, sleeves, etc) smooth UVs are the way to go. Also, if you really need UV edges in important/visible areas, you might consider using the smooth UV option, when it's on it'll only "break" open edges generally, due to approximation errors between zBrush and Mental Ray's way of smoothing things out along subdivision. If you have a hard-edged model by all means disable smooth UVs.
- In the MD3 options, set the following:
- UDim 0
- InitialFileIndex 1001
- MaxMapSize 2048 (or 4096 or 8192 depending on your resolution requirement/RAM)
- MapSizeAdjust 0 (extremely important)
- DpSubPix 0 (also extremely important)
- Border 4 (or 8, that's your texture "UV bleed" so use it wisely)
- Click on "Export Options" (still in the MD3 window), click on the second button (R32), click on Quick Code and enter the following:
- Click on Create All and be happy with your just created high-quality displacement map :) For info on how to plug it to Maya/Mental Ray, I highly recommend checking out these two links:
http://vimeo.com/groups/41328/videos/6625954
- For the record, zBrush 3.5 normal maps are much superior to zB 3.1's standard normal maps, so stick to your normal map generation in 3.5. If your re-built low base mesh differs a lot from your original base (highly unlikely), and you want to use the re-built base instead, generate the normal maps using MD3 as well, using the N8 option.
Credits go to CannedMushrooms for the massive groundwork and great code, shared on http://www.zbrushcentral.com/showthread.php?t=49443.
